
The morning after a storm is when small roof problems turn into expensive interior repairs. A few lifted shingles, a bent gutter, or water sneaking in around flashing may not look urgent from the ground, but they can quickly lead to leaks, rot, and insurance headaches. That is why a clear post storm roof maintenance checklist matters – it helps you protect the property, document what happened, and make smart decisions before damage spreads.
For homeowners and property managers, the goal is not to play roofer. It is to stay safe, catch visible warning signs early, and know when professional help is the right next step. After hail, wind, heavy rain, or falling debris, the best response is calm, methodical, and well documented.
Start with safety before anything else
If power lines are down, tree limbs are resting on the roof, or water is entering the building near electrical fixtures, stay back and address the immediate hazard first. Storm damage can create unstable roof areas, slick surfaces, and hidden structural issues. Walking the roof yourself is rarely worth the risk, especially right after a major weather event.
A safe inspection starts from the ground. Use binoculars if you have them. Walk the perimeter slowly and look at each roof slope from more than one angle. If you manage a commercial property, the same rule applies – visual checks are useful, but rooftop access should be handled by trained personnel with proper safety equipment.
Your post storm roof maintenance checklist for the first 24 hours
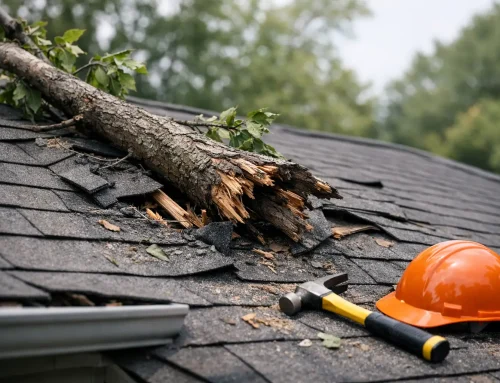
The first day is about visible damage, temporary protection, and documentation. Start by checking for missing, creased, or lifted shingles. Wind damage often breaks the seal that holds shingles flat, and once that seal is gone, future storms can do much more damage.
Next, look for impact marks from hail or debris. On asphalt shingles, hail can leave dark spots where granules have been knocked away. On metal components like vents, flashing, and gutters, dents are easier to spot and can help confirm the roof took a hit. Not every dent means the roof needs replacement, but it does tell you the storm had enough force to warrant a closer inspection.
Move your attention to gutters, downspouts, soffit, fascia, and siding. Roof systems do not fail in isolation. A torn gutter, loose downspout, or bent drip edge can redirect water where it should not go. If you find granules collecting in gutters or at downspout exits, that can point to shingle wear or storm impact.
Inside the property, check ceilings, attic spaces, and top-floor walls for fresh water stains, damp insulation, musty smells, or bubbling paint. Sometimes the roof damage is minor from the outside but reveals itself indoors first. If you see active leaking, use buckets, move valuables, and photograph the area before cleanup if possible.
What to photograph and document
Good documentation makes repairs easier to plan and insurance conversations easier to manage. Take wide shots of each elevation of the home or building, then closer images of specific damage. Include missing shingles, dented vents, displaced flashing, cracked skylight components, gutter separation, fallen branches, and any interior signs of water intrusion.
It also helps to note the date of the storm, approximate time, and the type of weather involved. Hail, straight-line wind, and wind-driven rain can damage roofs differently. If neighbors had similar problems, that can support the timeline, though your roof still needs its own inspection.
Do not throw away damaged materials that landed on the ground until you know whether they should be documented. A torn shingle tab or broken vent cap may be useful during the claims process.
Signs the roof needs fast professional attention
Some damage can wait a day or two for scheduling. Some cannot. If you see exposed underlayment, visible decking, sagging roof sections, punctures from branches, or water entering the structure, call for professional help right away. Temporary tarping may be needed to prevent further loss.
The same is true if flashing has pulled away around chimneys, valleys, or walls. These areas are common leak points even when the rest of the roof looks mostly intact. One loose flashing section can send water behind siding or into attic framing long before a ceiling stain becomes obvious.
Commercial properties have another layer of risk. Flat and low-slope roofs may hold standing water after a storm, and pooling can stress seams, drains, and membrane penetrations. If water remains longer than expected or you notice bubbling, seam separation, or wet ceiling tiles inside, a prompt inspection is the safer move.
A checklist should include what not to do
A strong post storm roof maintenance checklist is not just about action. It should also help you avoid costly mistakes. Do not climb onto a wet or damaged roof to “take a quick look.” Do not pressure wash storm debris off shingles. Do not caulk over visible damage as a shortcut. Temporary fixes done the wrong way can make later repairs harder and may complicate an insurance claim.
It is also wise not to assume that if a leak stopped, the problem is gone. Storm damage often shows up in stages. Wind can loosen materials in one event, and the next rain reveals the leak. That gap is why many property owners miss their best window to respond early.
Why a professional inspection matters
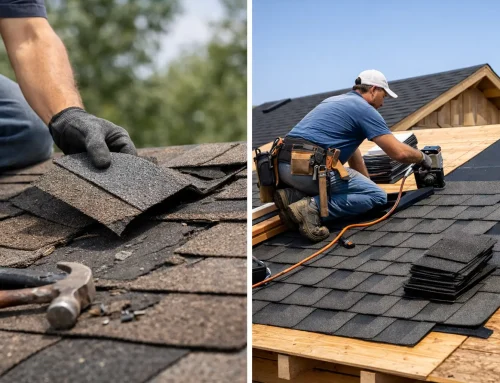
Storm damage is not always obvious from the ground. Hail bruising, lifted shingle seals, compromised flashing, and soft spots can be easy to miss without training. A professional inspection goes beyond surface appearance and helps determine whether the roof needs a minor repair, a targeted section replacement, or a full replacement.
This is also where experience with insurance claims becomes valuable. Proper documentation, scope notes, and photo evidence can make a real difference when meeting with an adjuster. A contractor who understands restoration work can help identify what belongs in the claim and what may be unrelated wear and tear. That distinction matters because not every roof issue after a storm was caused by the storm itself.
For many property owners, the biggest relief is having someone manage the process clearly. Crown Exteriors LLC works with homeowners and property managers through inspections, damage documentation, and claim support so the repair process feels less overwhelming and more organized.
Post-storm roof maintenance checklist for the following week
If the property is secure and no emergency tarping is needed, keep watching the roof system over the next several days. Check for new stains after the next rainfall. Monitor gutters for shingle granules and debris buildup. Look at downspout drainage to make sure water is moving away from the foundation rather than backing up at the roof edge.
If tree limbs scraped the roof but did not puncture it, that area still deserves attention. Granule loss and shingle scuffing can shorten roof life even if the damage does not cause an immediate leak. The same goes for loosened ridge caps and displaced flashing. They may look minor now and fail later.
This is also the right time to review roof age and prior repair history. A newer roof with isolated storm damage may be a repair candidate. An older roof with widespread damage may be better served by replacement. The right answer depends on material condition, repairability, code requirements, and what the insurance scope supports.
Maintenance after the storm is not just about the shingles
Roofs work as part of a larger exterior system. Gutters, siding, soffit, fascia, vents, and flashing all help direct water away from the structure. If one part fails, the problem can spread beyond the roof deck.
That is why post-storm maintenance should include clearing debris from valleys and gutters, checking that downspouts are connected and draining properly, and confirming that attic ventilation has not been blocked or damaged. These are not dramatic repairs, but they often prevent the next problem.
For commercial properties, maintenance may also include checking rooftop units, drains, coping, and edge metal. Storm damage around penetrations and roof-mounted equipment is common and easy to overlook if the inspection focuses only on the field membrane.
When to make the call
If you are unsure whether what you see is cosmetic or serious, schedule an inspection sooner rather than later. Waiting can increase interior damage, raise repair costs, and blur the timeline for an insurance claim. Fast action does not mean rushing into the wrong repair. It means getting clear answers while the damage is still fresh and easier to document.
A storm-tested roof is not always a failed roof, but it does deserve attention. The best next step is simple: stay safe, document everything you can from the ground, and get qualified eyes on the damage before a small issue becomes the reason you are repairing drywall, insulation, and flooring a month from now.
A careful response after the storm can save far more than money – it can save time, stress, and a lot of preventable damage.
Related Posts
If you enjoyed reading this, then please explore our other articles below: